
B-17G Thunderbird
Table of contents for B-17G Thunderbird
- B-17G Thunderbird
- B-17 ball turret, Mark I

I bought this model several years ago and am finally tackling it, a B-17G that I will build as Thunderbird, a celebrated plane of the 303rd Bombardment Group that flew out of Molesworth, England. My father-in-law, Robert Bates, flew in Thunderbird, a plane often used for new crew members because it was a lucky plane, surviving all its missions without any losses or injuries.
The Revell kit is pretty good, but with a few flaws and there are many aftermarket resin and photo-etch additions that make it a pretty spectacular build, and I will probably include many of these add-ons, but my first two fixes don’t require buying anything.
The kit-provided tail wheel is pretty horrible, especially when you consider that at this scale, it’s pretty easy to look inside the wheel well. The kit part has the tail strut and wheel as one molded part, so I separated the wheel from the strut and built a strut from a thick paperclip welded together with solder and built up with successive layers of Mr. Surfacer (both dissolved putty and the brush-on primer). I did a Google image search to get and idea of the basic construction of the tail wheel assembly. My effort isn’t very accurate, but it’s a lot closer than the kit part.
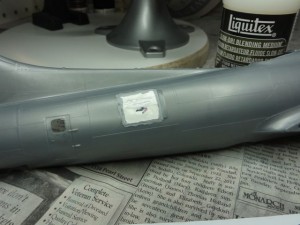
I also hated the large pins in the fuselage half that held the bulkhead (to which the wheel assembly is affixed) in place. I removed the pins and have a strip of styrene to aid in placement.
I’ve also added a scratch interior wheel cover from an odd piece of clear plastic I had lying around. It’s too thick scale wise, but that discrepancy shouldn’t be visible. There’s also a leather or canvas shroud that further protected the interior of the plane from water and dirt coming up from wheel well and I’ll scratch that from a thin paper bag. More on that later.
One of the big differences between Thunderbird and this Revell model is the location of the right waist gun; the waist guns are staggered on Thunderbird, and I’ve covered up the opening and will have to open up the fuselage later. Unfortunately this means half of my aftermarket waist gun resin kit will be discarded.
That’s all for now, but I hope you’ll enjoy future updates. I’ll have the challenge of making the appropriate decals and also adding rivet decals to the exterior and I’m really dreading adding detail to the main landing gear wells. It’s almost blank in the kit and I’m unsure how much to add in there.
%RELATEDPOSTS%